Is there anything cooler than customizing your outfits and garments with your art and needlework? Probably not. When you begin decorating your clothes, you will initially be overwhelmed with all the various options for making emblems.
Self-doing projects never disappoint you; they make you feel super satisfied every time you complete them. This is because you manage to do it right. Making personalized embroidered badges is an ideal example of this.
Badges are an ideal way to refine your old fabric and clothing to add a personalized touch. It not only lets you fully personalize your items but also lets you experiment with different materials and techniques. This blog will look at different approaches to making personalized badges. Let’s start with these flawless techniques of customizing your favourite accessory.
Different Methods Of Customizing Embroidered Badges
We get a little stuck when learning how to do it in the right way instead of knowing what worked right for us. So we would say do what you like, do what you like, and leave the rest. Make it your own. Let’s have a look at the two most famous ways to create your own Embroidered Patches.
Personalized Embroidered Badges Method 1:
Hand Embroidery

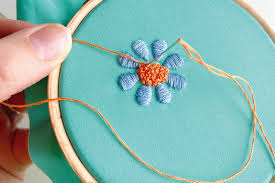
Hand embroidery is an adorning stitching method that includes using a thread and needle to make designs on a piece of cloth. It is an ideal option for creating custom-designed emblems because it allows for more distinctiveness and creativity than machine one. They have a more personal touch and can portray the maker’s skill and style. Also, they can be done on non-uniform or irregular surfaces, making it simpler to make personalized sizes and shapes for badges.
Required Materials
Embroidery thread and hoop
Needle
Scissors
Disappearing fabric marker or pencil
Instructions
- Pick your desired personalized patch design and move it onto your fabric.
- You can also draw your design freehand using any tracing paper or pencil to move a printed design onto the fabric. Ensure that your embroidery hoop and design are of the same size.
- Position your fabric in the hoop of embroidery and give an extra turn to the screw to secure it in the right place. This will make sure that the fabric is tight and doesn’t move anywhere while you’re stitching.
- It’s time to thread your needle with your desired thread. You can use one or many strands of thread, depending on the heaviness and look you’re opting for.
- Start stitching your personalized emblem design. You can utilize numerous stitches in hand embroideries, such as the satin stitch, backstitch, and French knot. Pick the stitch that suits your design and start stitching with the lines of your design.
- Keep going with the stitching till the design is complete. Ensure to knot the thread tightly at the end of the section to stop it from untangling.
- Once you are done with stitching, cut the excessive fabric around the edges of your emblem’s design and iron it on low to medium heat to remove all wrinkles.
- You can easily place this patch on your desired garment as embroidered iron on patches are quick to be placed on any area.
Tips And Techniques For Achieving A Professional-Looking Result
- Use a premium quality embroidery thread to ensure that the hues are vibrant and don’t fade over time.
- Exercise your sewing on a piece of trash fabric before you begin stitching your personalized designed badges.
- Utilize an embroidery hoop to keep your fabric tight and stop it from bunching up or wrinkling.
Personalized Embroidery Patches Method 2:
Applique

Applique is a fabric-making technique that incorporates layering a single piece of fabric on top of another to make a design. It is different from hand embroidery in terms that instead of directly stitching onto the fabric, you have to stitch the applique fabric onto a base fabric.
Required Materials
Base fabric
Applique fabric
Fusible webbing
Scissors
Iron
Needle and thread or sewing machine
Instructions
- Pick your personalized embroidered badge design and convey it onto your base fabric. Also, you can make your design freehand utilizing any tracing paper or pencil to move a printed design onto the cloth.
- Cut your applique cloth. You can also utilize scissors or rotary cutters to cut the shape of your design. Be sure to leave a little border around the corners of your design to allow stitching.
- Cut out a piece of fusible lacework that is smaller in size than your applique fabric. Place its sticky side down onto the opposite side of your applique fabric and start ironing it using a warm iron.
- It’s time to position your applique fabric onto the base fabric, ensuring it is focused and in the right position. Utilize an iron to blend the applique fabric onto the base fabric smoothly.
- Utilizing a needle and thread or sewing machine, start stitching around the borders of your applique fabric. You can utilize a zigzag stitch, straight stitch, or any other ornamental stitch you like. Ensure to stitch close to the border of the fabric to stop fraying.
- Cut any extra fabric around the borders of your personalized embroidery emblems and begin ironing it on medium to low heat to eliminate all types of wrinkles.
Tips And Techniques For Achieving A Professional-Looking Result
- Opt for the fabrics that match well with each other to assist you in outshining your design.
- Use melted webbing to simplify the applique procedure and stop the fabric from transferring while stitching.
- Try out various patterns and textures.
- Utilize a precise pair of scissors to stop fraying and obtain clean cuts.
- Pick fabrics that are simple to work with, like cotton. Don’t opt for stretchy or too thick fabrics, as they can be hard to sew.
Also, if you think designing on your own is like an uphill task and you need them in bunches, then you can contact any agency of Irish Embroidered Patches. Numerous service providers are working to assist people in their ornamental design journey.
Frequently Asked Questions
- How do I create my own embroidered badges?
Cut your embroidery to the patch size of the design.
Discover the border of your badge shape.
Keep your iron on medium heat and start ironing the back of it.
Peel off the backing and place the embroidery onto your fabric.
- What is utilized to create badges?
The most famous fabrics for making embroidered badges are acetate, polyester, cotton, wool, silk, and polyurethane. By far, the most widely used fabric is cotton because it is easy to work on as it is light in weight and soft.
- Is it difficult to embroider by hand?
Learning to do it is not as difficult as you think. Over time and with some practice, you will learn to do it flawlessly. Also, it is a great relaxing thing to do if you are a crafting enthusiast. It’s a kind of therapy.
The Ending Notes
One should not fear experimenting with new things with different approaches to make personalized embroidered badges that speak louder than anything. You can also stitch them on other garments like bags, key chains, etc. There are no limitations when it comes to designing a patch. You never know what incredible designs you will encounter until you try them. All you need to do is enjoy the procedure. Start designing your badge now, or you can also order them if you desire to have them in bulk. Show off your style and creativity by designing your emblems.

